

Table of Contents
- Why Velvet Pile Crushes and What You Need Before You Start
- Using a Needle Board for Velvet: The Professional Standard
- How to Steam Velvet Fabric Without Flattening the Nap
- Pressing Seams and Testing on Fabric Scraps First
- Removing Iron Marks from Velvet and Repairing Crushed Pile
- How to Press Velvet Without Crushing Pile: Fiber-by-Fiber Guide
- Frequently Asked Questions
Last Updated: September 12, 2026
Why Velvet Pile Crushes and What You Need Before You Start
Velvet pile crushes when heat, moisture, and direct pressure flatten the upright fibers that give the fabric its depth and sheen (britannica.com). Because velvet is a napped fabric, its pile has a direction, and once those fibers bend flat under an iron, they reflect light differently and leave a permanent-looking mark. At New Creations Fabric & Foam Inc, we supply velvet for apparel, costumes, and event decor, and the same question comes up constantly: how do you press velvet without crushing pile? The answer is never a hot iron pressed flat against the face. It is controlled steam, a specialized surface, and pressure applied from the back. Below, we break down the exact tools and steps, plus how to rescue velvet that has already been flattened.
A common mistake is treating velvet like cotton. Cotton forgives a hot iron; velvet does not. The pile is fragile, and heat combined with weight does the damage in seconds (marthastewart.com).
Tools Required for Pressing Velvet
The right setup prevents most crushing before it starts. You need a needle board or a thick terrycloth towel, a steam iron or vertical steamer, a pressing cloth, and a tailor's clapper or your hand for seam setting. A velvet board (also called a needle board) is the professional standard because its fine wire needles support the pile from underneath. If you do not own one, a folded terrycloth towel works as a DIY alternative. Keep the iron temperature low, and test on fabric scraps first.
| Tool | Purpose | Best For |
|---|---|---|
| Needle board | Supports pile from below | Seams, large flat pieces |
| Terrycloth towel | DIY pressing surface | Small projects, beginners |
| Vertical steamer | Relaxes fibers without contact | Finishing, hanging garments |
| Pressing cloth | Shields the fabric face | Any direct iron contact |
| Clapper | Sets seams flat | Tailored garment construction |
Using a Needle Board for Velvet: The Professional Standard
A needle board is the safest surface for pressing velvet because its bristles lift the pile and let steam pass through without flattening the nap (threadsmagazine.com). You place the fabric face-down onto the needles, so the pile sits upright between the wires while the iron presses the back. This is the single most reliable way to press velvet and the method most tailors reach for on expensive garments.
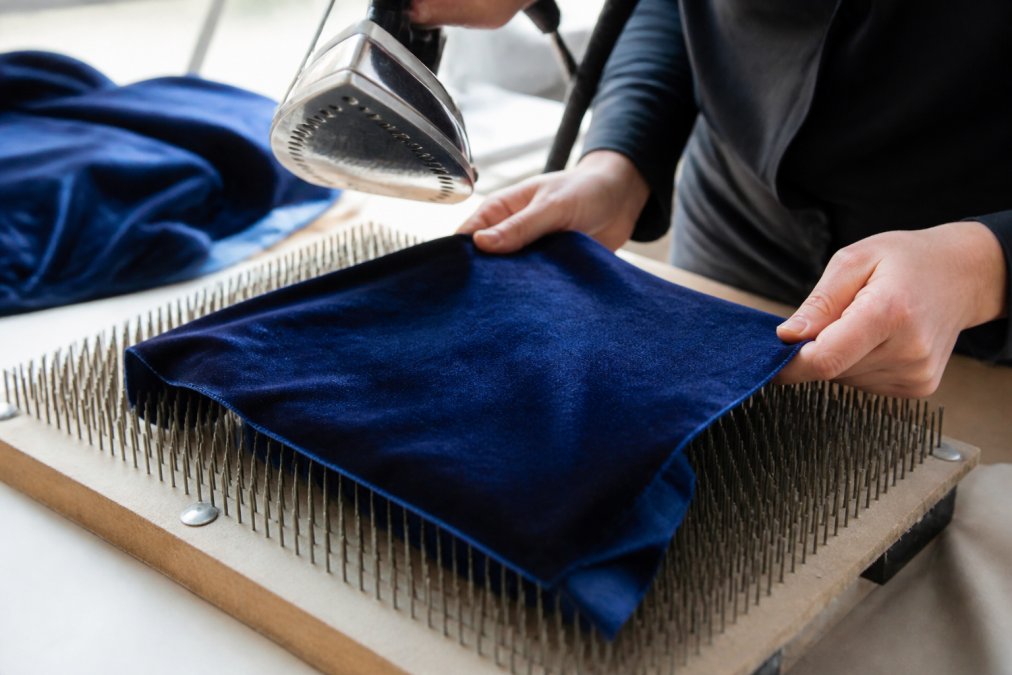
Here is the sequence to follow:
- Lay the velvet face-down on the needle board, aligning the pile with the board's direction.
- Set the iron to the lowest steam setting appropriate for the fiber.
- Lower the iron onto the back of the fabric, never the face.
- Let the steam do the work; do not press down hard.
- Lift the iron straight up rather than sliding it across the surface.
What most guides miss is that sliding the iron drags the pile and creates streaks, even from the back. Lift and reposition instead.
How to Steam Velvet Fabric Without Flattening the Nap
Steaming is the gentlest way to remove wrinkles from velvet because it relaxes the fibers without direct contact. A vertical steamer is ideal for hanging garments and drapes: hold the nozzle a few inches from the fabric and let the steam penetrate. For flat pieces, hover a steam iron just above the surface without touching it. Moisture and gentle heat let the pile recover its natural direction. Always steam with the nap, not against it, and let the fabric dry fully before wearing or storing it.
Pressing Seams and Testing on Fabric Scraps First
Seam pressing is where velvet construction gets tricky, because seams create bulk that tempts you to press hard. The fix is to never press the seam the way you would on cotton. Instead, work the seam from the back, support the pile, and let steam do the flattening.
The face-to-face seam method
For enclosed seams on velvet, use a face-to-face technique:
- Place the two fabric pieces right sides together, aligning the pile direction on both panels.
- Sew the seam as normal.
- Before opening the seam, press it flat from the back while the pieces are still face-to-face. This sets the stitches without exposing the pile to the iron.
- Open the seam and press it open from the back, using a seam roll or the edge of the needle board so the seam allowance sits flat without flattening the surrounding pile.
- Let the seam cool completely before moving the fabric. Warm pile reshapes easily; cool pile holds its set.
A seam roll is the unsung tool here. Its curved surface lets you press the seam allowance open without pressing the pile on either side of the seam. If you do not own one, roll a thick terrycloth towel into a tight cylinder and use that instead.
Why sliding the iron ruins seams
Even from the back, sliding the iron drags the pile and creates streaks that show on the face. Lift the iron straight up, reposition, and lower again. This is slower, but it is the difference between a clean seam and a permanently streaked panel.
Test on fabric scraps first, and test the right things
Every velvet behaves differently, and a scrap test tells you the safe iron temperature and how the pile responds to steam. Do not just test whether the iron scorches the scrap. Test these four things:
- Pile recovery: Steam a scrap, let it cool, and brush the pile. Does it stand back up, or stay flattened?
- Heat tolerance: Start at the lowest setting and work up in small increments on a scrap. Note the setting just below where the pile glazes or the fabric scorches.
- Nap direction: Run your hand with and against the nap. The scrap should show you which direction reflects light differently so you can keep pile direction consistent across panels.
- Steam response: Some velvets relax quickly under steam; others need a second pass. Time how long your scrap takes to recover so you know what to expect on the real piece.
Fiber-specific temperature starting points
Use these as starting points, then confirm on your own scrap:
| Fiber | Iron setting starting point | Steam | Notes |
|---|---|---|---|
| Silk velvet | Lowest / silk setting | Light steam | Most delicate; keep the iron off the face entirely |
| Cotton velvet | Low to medium | Moderate steam | More forgiving, but pile still crushes under pressure |
| Rayon velvet | Low | Light steam | Can water-spot; test steam on a scrap first |
| Polyester / synthetic velvet | Lowest / synthetic setting | Light steam | Scorches and glazes easily; keep heat low |
| Stretch velvet (with spandex) | Lowest | Light steam | Overheating can kill recovery; do not stretch while pressing |
| Crushed / panne velvet | Lowest | Light steam | Already has a patterned nap; press even more gently to avoid adding unintended marks |
- Test iron temperature on a scrap of the same velvet
- Confirm the pile direction before pressing
- Press seams from the back only
- Let each pressed section cool before the next
Removing Iron Marks from Velvet and Repairing Crushed Pile
Crushed pile is often recoverable, which surprises most people. Heat and moisture can relax flattened fibers and encourage them to stand back up. Hold a steamer over the crushed area, then gently brush the pile with a soft brush or your fingertips in the nap direction. For stubborn marks, re-steam and let the fabric hang. Synthetic velvet responds well to steam but poorly to high heat, so keep the iron away from the face entirely. Silk velvet needs the most caution: lower heat, more distance, and patience. If a mark will not lift, a light steaming followed by overnight hanging often finishes the job.

How to Press Velvet Without Crushing Pile: Fiber-by-Fiber Guide
Different velvets demand different handling, and treating them all the same is how pile gets ruined. The fiber content determines heat tolerance, steam response, and how much pressure the pile can take before it stays flat. Below is a fiber-by-fiber breakdown, plus what to do when pile is already crushed.
Why fiber content changes everything
Velvet pile is made of the same fiber as the backing, and each fiber has a different glass-transition and melting point. Natural fibers like silk and cotton tolerate more heat before they scorch, but they still crush under pressure. Synthetic fibers like polyester and nylon soften at lower temperatures, so a setting that is safe for cotton can glaze or melt synthetic pile. Spandex in stretch velvet loses its recovery when overheated, which means the fabric stops springing back after it is stretched. Matching your method to the fiber is the difference between a crisp finish and a ruined panel.
Fiber-by-fiber pressing guide
Silk velvet. The most delicate. Use the lowest heat setting, keep the iron off the face entirely, and rely on steam. Silk can water-spot, so test steam on a scrap first. Press from the back only, with a pressing cloth between the iron and the fabric.
Cotton velvet. More forgiving than silk but still crushes under pressure. Use low to medium heat, moderate steam, and press from the back. Cotton velvet is a good candidate for the terrycloth-towel method if you do not own a needle board.
Rayon velvet. Low heat, light steam. Rayon can water-spot and can lose strength when wet, so do not over-steam. Test on a scrap before committing.
Polyester and synthetic velvet. Tolerates steam well but scorches or glazes under a hot iron. Use the lowest setting, keep the iron off the face, and never let the iron rest on the fabric. If you see a shiny glaze appear, stop immediately, that is melted pile.
Stretch velvet (with spandex). Can lose its recovery if overheated. Keep temperatures low, avoid stretching the fabric while pressing, and let the fabric cool completely before handling. A stretch velvet with reliable recovery and consistent pile makes pressing far more predictable.
Crushed or panne velvet. Already has a flattened, patterned nap, so you press it even more gently to avoid adding unintended marks. Use low heat and light steam, and do not try to brush the pile upright, the crushed texture is the point.
Velveteen. A short-pile cousin of velvet, often cotton or cotton-blend. It is more durable than true velvet but still crushes. Use low heat and press from the back.
Rescuing already-crushed pile
Most guides stop at prevention. If pile is already flattened, it is often recoverable. Heat and moisture can relax flattened fibers and encourage them to stand back up.
- Hold a steamer over the crushed area, a few inches from the surface. Do not touch the fabric with the nozzle.
- Let the steam penetrate for several seconds.
- Gently brush the pile with a soft brush or your fingertips in the nap direction.
- Let the fabric hang and dry completely. Gravity helps the pile stand upright.
- For stubborn marks, repeat the steam-and-brush cycle. If the mark will not lift after two or three passes, a light steaming followed by overnight hanging often finishes the job.
Synthetic velvet responds well to steam but poorly to high heat, so keep the iron away from the face entirely. Silk velvet needs the most caution: lower heat, more distance, and patience. If the pile has been melted or glazed rather than merely flattened, it cannot be restored, the fiber has changed permanently.
For apparel and costume makers, a stretch velvet with reliable recovery and consistent pile makes pressing far more predictable. New Creations Fabric & Foam Inc carries a Stretch Velvet 58" Wide suited to garments and costumes, along with a Royal Velvet Fabric 58" Wide and a Micro Velvet Fabric 45" Wide for projects that call for a non-stretch option. Consistent pile height across a roll is what keeps your pressing results even from one piece to the next.


Frequently Asked Questions
How do you press velvet without crushing the pile?
Always press velvet face-down on a needle board or a thick terrycloth towel, never directly on the ironing board. Use low heat with plenty of steam and let the iron hover just above the fabric rather than pressing down hard. Test on a scrap first to confirm your iron temperature does not flatten the nap.
Can velvet be heat pressed?
Yes, but with strict temperature control. Synthetic velvet like polyester tolerates low to medium heat, while silk velvet scorches easily. Set your iron to the lowest steam setting, keep the soleplate off the pile, and work in small sections. A pressing cloth between the iron and the fabric adds another layer of protection against heat damage.
What is a needle board used for in sewing?
A needle board is a pressing surface covered in fine wire needles that support the velvet pile while you iron the back of the fabric. The needles let steam pass through and keep the nap from flattening under the iron's weight. It is the standard tool for pressing velvet seams, hems, and darts in garment construction without leaving crush marks.
How do you fix crushed velvet pile after ironing?
Steam the crushed area with a vertical steamer held a few inches away, then brush the nap gently with a soft-bristle brush in the direction of the pile. For stubborn marks, hang the garment in a steamy bathroom overnight. Most synthetic velvets recover well because heat setting allows the fibers to relax back into shape.