

Table of Contents
- What You'll Need: Materials, Tools, and Budget
- DIY Backdrop Stand Ideas: PVC, Wood, and Grid Frames
- Step-by-Step: How to Build Your DIY Event Backdrops
- Best Fabric for Event Backdrops: Poplin, Organza, and Sequin
- How to Attach Fabric to a Backdrop Frame
- Stability and Safety: Weight-Bearing and Indoor vs. Outdoor
- Breakdown, Transport, and Reuse for Repeat Events
- Frequently Asked Questions
Last Updated: September 14, 2026
What You'll Need: Materials, Tools, and Budget
Learning how to make diy event backdrops starts with knowing what to buy. A solid materials list prevents mid-project supply runs and keeps your budget predictable.
Most builds fall into two camps: a PVC pipe stand for fast, portable setups, or a wooden frame for permanent, load-bearing structures. Both need the same core supplies in different quantities.
Materials and Supplies Checklist
- Frame material: 3/4-inch PVC pipe and fittings, or 1x3 and 2x4 lumber
- Fabric: Poplin, organza, or sequin panels, sized to your frame with 6-12 inches of extra drop
- Fasteners: Wood screws, PVC cement, zip ties, staple gun staples
- Base weights: Sandbags, concrete pavers, or water jugs for outdoor stability
- Finishing supplies: Sandpaper (120 and 220 grit), primer, paint
- Decor: Floral stems, balloon clusters, ribbon, or a lighting strip
For fabric, the Textile Exchange's materials overview explains how fiber choice affects drape, opacity, and how a backdrop photographs under event lighting.
Tools Required for Construction
- Tape measure and pencil
- Jigsaw or hand saw for wood; PVC cutter or hacksaw for pipe
- Cordless drill with driver bits
- Staple gun
- Sanding block or orbital sander
- Level and a helper for tall frames
DIY Backdrop Stand Ideas: PVC, Wood, and Grid Frames
The best DIY backdrop stand for first-time builders is a PVC pipe frame: light, cheap, and assembled in minutes without power tools. Wood and grid panel frames cost more and take longer, but hold heavier decor and survive repeated events.
PVC Pipe Stand for Quick Setup
A PVC stand uses 3/4-inch pipe cut into two vertical supports, one crossbar, and two base legs. Push everything together with elbow and tee fittings, then weight the base legs with sandbags. The frame breaks down into a bundle you can carry in one trip.
The trade-off: PVC flexes under heavy floral or drapery loads. Keep decorations light, or add a center vertical support for wide spans.
Wooden Frame and Grid Panel Options
A wooden frame built from 1x3 lumber with 2x4 base plates handles far more weight. Grid panels, sold as modular wire or MDF sections, attach directly to the wood frame and give you a surface for zip-tying flowers, balloons, or signage.
OSHA's guidance on safe lifting and materials handling is worth a quick read before you plan a two-person build day, since tall frames and heavy panels are the most common source of strain injuries in DIY projects.
| Frame Type | Setup Time | Weight Capacity | Best For |
|---|---|---|---|
| PVC pipe | 10-15 min | Light fabric, balloons | Fast, portable setups |
| Wooden frame | 45-60 min | Heavy drape, florals | Repeat events, indoor |
| Grid panel | 30-45 min | Moderate, modular decor | Custom shapes, arches |
Step-by-Step: How to Build Your DIY Event Backdrops
Here is the full build sequence. Expect roughly two hours for a wooden frame and under 30 minutes for PVC. The steps assume a standard 8-foot-wide by 7-foot-tall backdrop, the most common size for photo walls and ceremony backdrops. Scale proportionally for larger builds.
Step 1: Plan Your Dimensions and Cut List
Decide your finished width and height first, then work backward to a cut list. For an 8-foot by 7-foot wooden frame:
- Two vertical supports: 7 feet each (1x3 lumber)
- One top crossbar: 8 feet (1x3 lumber)
- Two base plates: 24-30 inches each (2x4 lumber), laid flat for stability
- Optional center vertical: 7 feet, for spans over 6 feet or heavy decor
For a PVC frame at the same size, use 3/4-inch pipe:

- Two verticals: 7 feet
- One crossbar: 8 feet
- Two base legs: 24 inches each
- Fittings: four 90-degree elbows, two tees, and two end caps
Measure twice and mark cuts with a pencil. A framing square or straight edge keeps cut lines square; out-of-square cuts make the frame wobble.
Step 2: Cut and Assemble the Frame
Cut pipe or lumber to length. For wood, cut two vertical supports, one top crossbar, and two base plates. Drill pilot holes before driving screws to prevent splitting, especially near the ends of 1x3 lumber.
Assembly order for wood:
- Attach each vertical support to its base plate with two 2-1/2 inch exterior screws driven through the base plate into the bottom of the vertical.
- Stand the assemblies upright and attach the top crossbar across the tops, driving two screws into each vertical.
- If using a center vertical, attach it to the crossbar and add a small base plate or foot at the floor.
- Check for square by measuring diagonally corner to corner; both diagonals should match. If not, rack the frame gently until they do, then tighten.
Assembly order for PVC:
- Push the base legs onto the tees, then push the verticals into the top of each tee.
- Push elbows onto the tops of the verticals.
- Push the crossbar between the two elbows.
- Cap the open ends of the base legs so sand or water cannot get inside if you fill them for ballast.
Expected result: A free-standing rectangular frame that sits level on the floor and does not rock when you press gently on the top crossbar.
Step 3: Sand, Paint, and Finish the Frame
Sand all cut edges with 120 grit, then 220 grit, to remove splinters and rough grain. Wipe off dust, apply primer, and paint. Let it cure fully. For PVC, a light scuff with 220 grit plus a plastic-bonding primer helps paint adhere; bare PVC sheds most paints.
Expected result: A smooth, splinter-free frame that will not snag fabric and that looks finished rather than improvised.
Step 4: Attach Fabric and Decorate
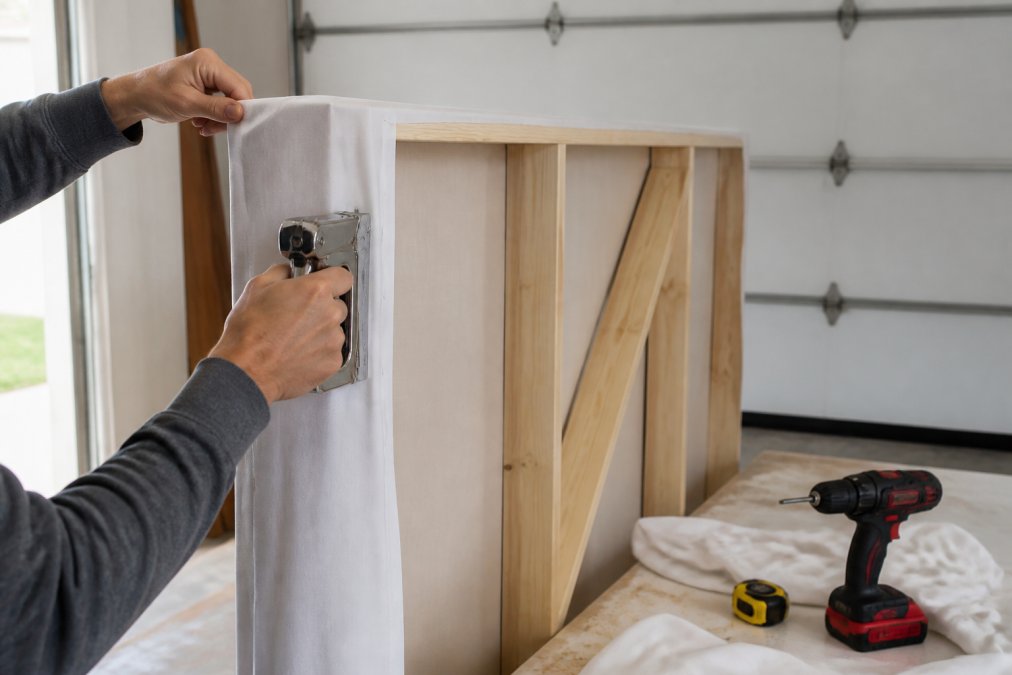
Drape your fabric panel over the crossbar, leaving even drop on both sides. Start at the center and work outward, pulling taut. Staple every 4-6 inches along the top edge for wood frames, or zip-tie through grommets or folded fabric edges for PVC and grid panels. Pull taut, then secure the sides.
Tension separates a professional-looking backdrop from a wrinkled one. Two mechanics matter:
- Even pull: Pull from the center outward on both sides so the fabric stays centered and neither side runs short.
- Vertical tension: After the top is secured, pull the fabric down and slightly outward at the bottom corners, then secure. This removes horizontal wrinkles that show up in photos.
Add florals, balloons, or lighting last, distributing weight across the crossbar rather than clustering it.
Expected result: A wrinkle-free, evenly draped backdrop ready for photos.
The frame is the easy part. Tension separates a professional-looking backdrop from a wrinkled one, so budget time for pulling and re-pinning fabric, not just building. A 10-minute frame with 30 minutes of fabric work will out-photograph a 60-minute frame with 5 minutes of fabric work every time.
Best Fabric for Event Backdrops: Poplin, Organza, and Sequin
The best fabric for event backdrops depends on the look you want and your lighting. Poplin gives an opaque, seamless wall. Organza adds sheer shimmer and layering. Sequin delivers maximum sparkle for statement pieces.
Poplin is the workhorse. A seamless polyester poplin panel, like the Backdrop Drape Curtain 10 Feet Wide x 6 Feet High, hangs straight, photographs cleanly, and comes with a 4-inch rod pocket for quick hanging. At New Creations Fabric & Foam Inc, this is the panel we recommend for anyone building a first backdrop.
For shimmer, a Crushed Iridescent Organza layered over poplin creates depth that shifts under event lighting. A Crystal Organza holds its shape well for structured draping. And for a glamorous focal wall, Round Sequin Fabric by the Yard delivers full-coverage shine.


| Fabric | Look | Opacity | Best For |
|---|---|---|---|
| Poplin | Matte, clean | Opaque | Seamless photo walls |
| Organza | Sheer shimmer | Semi-sheer | Layering, draping |
| Sequin | High sparkle | Opaque | Statement focal points |
How to Attach Fabric to a Backdrop Frame
Attaching fabric cleanly comes down to tension and even spacing. Three methods cover most builds:
- Staple gun: Fastest for wood frames. Staple every 4-6 inches along the top, pulling taut as you go.
- Zip ties: Best for PVC and grid panels. Loop through grommets or folded fabric edges and cinch tight.
- Rod pocket: Slide a sewn rod pocket over your crossbar for a tool-free, reusable hang.
Start at the center and work outward on both sides. This keeps the fabric centered and prevents one side from running short.
Stability and Safety: Weight-Bearing and Indoor vs. Outdoor
Stability is the difference between a backdrop that survives an event and one that becomes a liability. Every freestanding frame needs weighted base plates, and the weight required depends on frame height, fabric surface area, and indoor vs. outdoor use. Most DIY guides skip that math, which is why toppled backdrops are a common event-day failure.
How Much Weight Your Base Actually Needs
A freestanding backdrop is a lever. The taller the frame and wider the panel, the more force a bump, gust, or leaning guest applies at the top, and the more counterweight you need at the base. Rule of thumb: total ballast should at least equal the weight of the frame plus decor, and for outdoor setups, two to three times that figure (osha.gov).
Concrete numbers to plan around:
- Indoor, light fabric (poplin or organza), frame under 8 feet: 15-25 lb per base leg is usually sufficient.
- Indoor, heavy decor (sequin, dense florals, balloon clusters): 30-40 lb per base leg, plus a center vertical support on spans wider than 6 feet.
- Outdoor, any fabric: 40-60 lb per base leg minimum, staked or tethered in addition to ballast.
- Outdoor, tall or wide frame (over 8 feet): treat ballast as a starting point only and add guy lines or stakes; a fabric panel acts like a sail and wind load rises with the square of wind speed, so a 10 mph breeze is roughly four times the load of a 5 mph breeze on the same panel.
Sandbags, concrete pavers, and water jugs all work. Water is most portable since you fill it on site, but a filled 5-gallon jug weighs about 40 lb, so plan your vehicle and your back accordingly.
Indoor vs. Outdoor: What Changes
Indoors, the main risks are foot traffic, table bumping, and HVAC drafts near ceiling vents. Weight the base, keep the frame out of walkways, and never let a backdrop double as a photo-booth wall guests lean against.
Outdoors, wind is the dominant force and the one most DIY builders underestimate. A 6-foot by 8-foot fabric panel presents roughly 48 square feet of sail area. Even a moderate breeze pushes hard against that surface, and the load transfers into your joints. Press-fit PVC joints pop apart under repeated stress; screwed wood joints hold longer but can split at the base plate if the lumber is thin.
Outdoor checklist:
- Stake or tether every base plate into the ground, not just weight it.
- Orient the frame so the fabric panel is parallel to the prevailing wind, not perpendicular.
- Avoid tall, narrow frames; a wider base footprint resists tipping far better than a narrow one.
- Take the frame down if wind is forecast above roughly 15 mph, or if gusts are expected. No ballast system is worth a frame landing on a guest.
Joint Strength and Load Distribution
Weight-bearing capacity depends on frame material and joint construction. Wood frames with screws and pilot holes hold more than press-fit PVC, and PVC holds more than friction-fit connectors alone. If you hang heavy florals, a dense sequin panel, or anything adding more than a few pounds of point load, add a center vertical support and distribute decor across the crossbar rather than clustering it.
A backdrop frame is not a climbing structure and not a shelter. Never let guests lean on it, never hang anything from the crossbar that exceeds the frame's rated capacity, and never leave an outdoor frame up overnight. Wind loads on a fabric sail can snap joints or send the whole frame over, and an unweighted frame indoors can topple onto tables or people.
Ballast is not a one-size number. Match the weight to frame height, fabric surface area, and wind exposure, and when in doubt, add more. A backdrop that stays upright is worth far more than one that looks perfect for ten minutes.
Breakdown, Transport, and Reuse for Repeat Events
If you build backdrops for multiple events, design for teardown from day one. Label every joint and pipe section so reassembly takes minutes instead of guesswork.
Store fabric panels rolled, not folded, to prevent crease lines that show up in photos. Poplin and organza release wrinkles with a light steam, but sequin mesh should stay flat and unpressed to protect the stitching. Keep fasteners, fittings, and base plates in one labeled bin so nothing goes missing.
Reusing your frame is also the most sustainable option. Refinishing a wooden frame or swapping fabric panels costs far less than building new each time, and keeps materials out of the waste stream.
Building a backdrop that photographs well and survives a full event comes down to three things: a frame that holds its shape, fabric with the right drape and opacity, and enough weight at the base to keep it standing. New Creations Fabric & Foam Inc supplies the fabric side of that equation with seamless poplin drapes, iridescent and crystal organza, and round sequin mesh built for event decor and repeated use. Explore Fabrics to find the panel that matches your next backdrop, and get a finish that looks intentional rather than improvised.
Frequently Asked Questions
What materials are best for DIY event backdrops?
For the frame, 1x3 lumber, PVC pipe, or interlocking grid panels work well and cost little. For the cover, polyester poplin is a reliable choice because it hangs smoothly and resists wrinkles. A 10-foot-wide by 6-foot-high seamless panel (about $32.95) covers a standard photo area with no visible seams. Add sequin or organza overlays for shimmer. Fasten everything with heavy-duty staples, zip ties, or hook-and-loop tape, and use sandbags or base plates to keep the frame from tipping.
How do you make a backdrop stand for an event?
Build a simple frame from 1x3 lumber or 1.5-inch PVC pipe. Cut two vertical supports and one horizontal crossbar to your desired size, then join them with corner brackets or PVC elbows. Add a base plate or cinder blocks at the bottom for stability. For a portable option, use a foldable arch or grid panel stand that breaks down flat. Test the frame indoors before the event, and always secure it with sandbags if guests will be nearby.
How do you attach fabric to a backdrop frame?
The method depends on your frame. On wood, use a staple gun or hook-and-loop tape along the top edge. On PVC or metal, drape the fabric over the crossbar and secure it with zip ties, clamps, or curtain clips. For a rod pocket panel, slide a pipe or dowel through the top pocket and mount it on the frame. Pull the fabric taut to avoid sagging, and hide raw edges with a decorative ribbon or a second fabric layer.
Are foam boards good for DIY event backdrops?
Foam boards are lightweight and easy to cut into arches or custom shapes, which makes them useful for small decorative accents. However, they dent easily and cannot support heavy drapes or sequin fabric without bending. For a full-size backdrop, use a wood or PVC frame and reserve foam board for letters, signage, or layered cutouts. If you use foam, attach it to a rigid backing and keep it indoors away from moisture and wind.